Model Description
This is a series of demonstrations using a smoke tunnel for flow visualization, including laminar/turbulent flow and separation. This demonstration should take 10-15 minutes.
Engineering Principle
This demonstration can be used in the context of several lessons, including external flow, Computation Fluid Dynamics (CFD), and lift/drag.
External Flow/CFD: Properties within a flow field vary depending on whether the flow is laminar or turbulent. Laminar flow properties can be found using either the Bernoulli equation (inviscid flow) or the Navier-Stokes equations (viscous flow). The Navier-Stokes equations struggle with calculating turbulent flow properties and most often these flows are found using CFD. Part of the reason is the unpredictable and random nature of turbulent flow.
Lift/Drag: The lift created by an airfoil varies as a function of angle of attack – as the angle increases, so does the lift. However, at the critical angle of attack, the flow will separate from the airfoil with a corresponding drop in lift and increase in drag. Drag on an object is due to changes in pressure across a body. As the flow approaches a body, a stagnation point is formed and the flow is zero. As the flow moves away from that point, the velocity increases, thereby causing the pressure to decrease (Bernoulli). This is the cause of pressure drag, which is the dominant form of drag on objects.
What You Need
| Item | Quantity | Description/Clarification |
|---|---|---|
| Smoke Tunnel | 1 | Models vary based on capabilities desired and cost. |
| Shapes to put in the Smoke Tunnel | Various | Common shapes include airfoils, cylinders, and flat plates. |

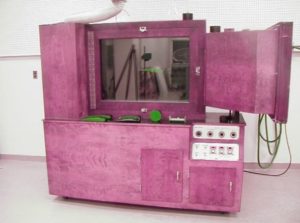
Smoke tunnel.
How It’s Done
Before Class: Put the first shape you plan on using into the smoke tunnel. If required, warm up the smoke generator.
In Class:
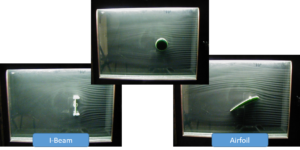
External Flow: For this class, the demonstration is best done toward the end of class, depending on the location of the smoke tunnel relative to the classroom. Normally the best shapes to use are a cylinder and a flat plate (normal to the flow). The flow around the cylinder (top image in figure below) will enable the students to see how the flow conforms to the shape of the body, until it separates as the body’s geometry turns away from the flow. Slowly increase velocity and point out how the separation point moves further back on the cylinder.

For the flat plate, the flow will initially stagnate at the front, but will move to the top and bottom of the plate. Because the plate is normal to the flow, the drag force is due to the pressure only – there is no skin friction (shear stresses are not in the flow direction). Once you are established in the turbulent flow regime, point out how the different eddies develop in the flow, and that no two are alike (i.e. random). Reinforce how the unpredictable behavior makes it hard to analyze properties in the turbulent flow regime.
Regardless of the shape used in the smoke tunnel, the students should be able to see the stagnation point at the front of the body. They should also be able to see that as the flow moves away from that point, the velocity increases. They won’t be able to see the decrease in pressure, but they know it’s there based on Bernoulli.
CFD: It is best to begin this class at the smoke tunnel, pointing out the random nature of the eddies during turbulent flow. Use this as a lead-in to the discussion of the need for CFD to analyze turbulent flow, which is significantly more complex than laminar flow.
Observations: In each demonstration, the students can obtain a better idea of what is happening as the flow moves over bodies of various shapes and sizes. The capabilities of the specific smoke tunnel will determine the extent of the student’s learning experience.
Instructor Tips: Use as many of the different shapes in the smoke tunnel as possible so the students see the effects that geometry has on the flow field. Particularly, the use of different shapes can precipitate the discussion of how streamlining is used to delay separation and therefore reduce pressure drag.
